
Check Your Veneer Dryer Machine Before Adjusting Hot Pressing
Mark-free panels rarely come from "press fixes" alone. In plywood production, the surface you see after hot pressing is strongly influenced by what arrives before pressing: the condition of the drying veneer, sheet flatness, and how consistent the Veneer Drying System is from batch to batch. When a line starts chasing marks by changing hot pressing and leveling settings first, the team often ends up compensating for unstable incoming veneer rather than solving the root cause.
A practical approach is to treat the veneer dryer machine exit as a quality gate: confirm moisture consistency, confirm flatness (including buckle and end waviness), and ensure a gluing-ready surface. Only after that gate is stable does it make sense to judge whether press parameters or downstream correction really need to change.

Why Veneer Drying Validation Comes First
The condition of veneer leaving a Veneer Drying System becomes the "starting condition" for gluing, layup, and hot pressing. If that starting condition varies, then every downstream adjustment becomes harder to evaluate—because you are changing press behavior while the raw input keeps shifting.
In mills aiming for panels without visible marks, the most useful sequence is typically:
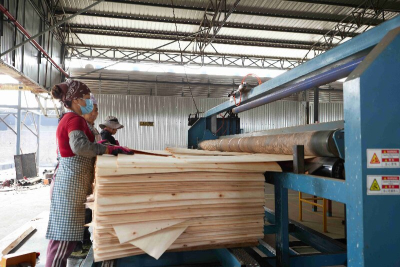
Check dryer-exit moisture consistency across representative veneer sheets (not just a single sheet).
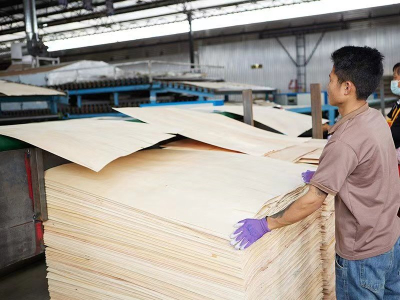
Inspect flatness and record any buckle or end waviness.
Look for visible drying defects such as splits.
Confirm surface condition for gluing (the veneer should be suitable for bonding).
Then evaluate gluing, assembly, and hot pressing based on a stable input.
Decide whether leveling or other correction is still required.
This isn’t to say every mark originates in the drying veneer. It simply prevents hot pressing changes from being judged against an unstable upstream variable.
What to Verify at the Veneer Dryer Machine Exit
For day-to-day troubleshooting, the veneer dryer machine exit is a clear dividing line between upstream and downstream variables. Instead of relying on vague opinions ("the veneer feels OK"), a team can build a repeatable routine focused on four checks directly tied to downstream press stability.

1) Moisture Consistency Across Sheets
Moisture variation is one of the quickest ways to shrink the "safe window" for hot pressing. Even when average moisture seems acceptable, an uneven distribution across sheets can drive inconsistent heat transfer and changing compression behavior—conditions that often show up as panel marks.
2) Flatness Including Buckle and End Waviness
Flat veneer supports predictable layup thickness and more uniform pressure contact during pressing. When veneer arrives with buckle or end waviness, the press is forced to correct geometry that should have been stabilized earlier in the process.
3) Splits and Visible Drying Defects
Splits are not only a yield issue; they can also complicate assembly and alter how pressure and glue distribute, especially when defects cluster within a batch.
4) Surface Condition Suitable for Gluing
A stable, gluing-ready veneer surface reduces the temptation to "push" press settings to compensate for weak bonding conditions. Keeping drying veneer output consistent makes it easier to troubleshoot gluing and pressing separately.
What a Roller Veneer Drying System Delivers
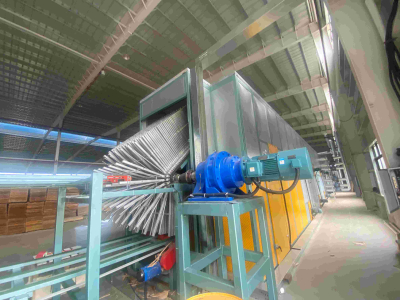
Many buyers evaluate roller designs due to their stated focus on veneer flatness and uniformity. Our Shine Machinery roller design is a low-drying-cost solution that aims for uniform moisture content and veneer that is flat without buckle or end waviness. The veneer is also free of splits and has a surface in good condition for gluing. We also ensure shrinkage and casehardening are kept to a minimum, and collapse and honeycomb are avoided.
Our core veneer dryer machine also features frequency conversion, allowing transmission speed and temperature to be adjusted automatically to achieve the ideal drying effect. This automatic adjustment is crucial for factories that want plywood veneer drying that remains consistent without frequent manual intervention.
Additionally, we offer other veneer drying machine configurations using automatic electric control and frequency conversion to regulate speed and temperature based on veneer thickness and moisture content.
For a mill aiming to reduce marks, these design intentions are important because they target the same acceptance conditions that stabilize hot pressing: moisture consistency, flatness, and a surface ready for gluing.
Vertical Veneer Dryer vs. Roller Designs: Not Interchangeable
It’s common to compare a Vertical Veneer Dryer to a roller system primarily on cost or footprint. But the more decision-relevant question for mark-free panels is whether the chosen Veneer Drying System aligns with your required veneer condition at the dryer exit.
Our vertical drying descriptions emphasize uniform airflow, steady temperature, and use of a countercurrent drying cycle to support quick drying with uniform quality. Vertical designs also boast very low purchase cost, a small footprint, and three-dimensional loading; it's often noted that this equipment can cover about two-thirds of the roller dryer area.
In our product descriptions, certain vertical configurations are positioned for veneers with lower flatness requirements. This single detail is crucial: if a project’s acceptance criteria place flatness at the top of the list, procurement teams usually treat the vertical route and roller route as serving different priorities rather than being direct substitutes.
A simple buyer-oriented comparison looks like this:
| Selection Focus | Roller Veneer Drying System (Positioning) | Vertical Veneer Dryer (Positioning) |
|---|---|---|
| Flatness Priority | Flat veneer without buckle or end waviness is emphasized | Can be used for veneers with lower flatness requirements |
| Consistency Cues | Uniform moisture content and gluing-ready surface are emphasized | Uniform airflow and steady temperature are emphasized |
| Footprint and Loading | Roller transport layout | Three-dimensional loading, smaller installation area |
| Cost Angle | Low drying cost described for roller configurations | Low purchase cost and low drying cost are emphasized |
When panel appearance is sensitive, this kind of comparison helps prevent an expensive mistake: choosing a dryer category that optimizes cost and footprint while underweighting flatness at the dryer exit.
Low Cost Veneer Dryer Selection Still Needs a Clear Exit Target
Budget-driven projects often start with a "Low Cost Veneer Dryer" request, but the practical purchasing question is: low cost for which acceptance condition? If the veneer dryer machine cannot repeatedly achieve the exit condition your press line needs, the initial cost advantage can quickly be eroded by rework, rejects, and constant press-side adjustment.
Shine Machinery offers a roller-type Low Cost Veneer Dryer Machine with a 3 m working width, a veneer thickness range of 0.8–8 mm, a 32 m heating area length, and a stated drying capacity of 50–60 m³/day. The heat source is typically a biomass burner, with other options available to meet specific needs.
For buyers seeking more detailed roller specifications, we also document a roller dryer model GTH30-20 with a 3.0 m working width, 4 decks, and a veneer thickness range of 0.6–8 mm. It's designed to dry fresh veneer to about 8–10% moisture content, utilizing waste wood as heating material within an adjustable 140–200°C range. This specification also includes temperature control accuracy of ±5°C, automatic temperature control, speed regulation, and frequency-controlled traction motors.
The key takeaway for troubleshooting marks is clear: whether a project prioritizes premium output or low drying veneer cost, plywood veneer drying still greatly benefits from defining a precise acceptance condition at the dryer exit—then selecting a veneer dryer machine that is designed to consistently deliver it.
A Field Checklist Before Changing Hot Pressing and Leveling
Before the next round of hot pressing or leveling adjustments, many production teams run a quick verification at the Veneer Drying System exit.
Sample across multiple sheets per batch and record moisture readings.
Visually grade flatness and note any buckle or end waviness.
Record splits and obvious drying defects.
Confirm gluing readiness by checking whether the dried surface condition is suitable for bonding.
If results vary noticeably from sheet to sheet or batch to batch, stabilize drying veneer output first.
Only after the veneer dryer machine exit is stable does it become truly meaningful to judge whether press settings are the limiting factor.
FAQs
What should be validated before changing hot pressing for mark-free panels?
A practical first step is validating veneer dryer machine output: moisture consistency, flatness (including buckle and end waviness), splits, and surface condition suitable for gluing.
What does Shine Machinery emphasize for its roller core veneer dryer machine?
Our roller description highlights uniform moisture content, flat veneer without buckle or end waviness, veneer free of splits, and a surface in good condition for gluing. It also notes frequency conversion for automatic adjustment of speed and temperature, ensuring consistent plywood veneer drying.
When is a Vertical Veneer Dryer typically evaluated?
Shine Machinery positions vertical drying around uniform airflow, steady temperature, countercurrent drying, a compact footprint, and low purchase/drying cost. It's also noted that it can be used for veneers with lower flatness requirements, making it ideal for specific applications.
What specifications are listed for a Low Cost Veneer Dryer Machine?
Shine Machinery lists a roller type with a 3 m working width, a 0.8–8 mm veneer thickness range, a 32 m heating area length, a 50–60 m³/day capacity, and a biomass burner as a heat source (with other options available).
Where can buyers review more veneer drying options?
Our comprehensive product categories and configurations are presented on www.veneersdryer.com.